Thursday, March 28, 2013

Sheetrock Damage

Sheetrock damage from leaks can be a real pain, in this case, it had leaked long enough that a wide area had warped and started to sag.
  The only option at this point is to rip out all the bad sheetrock (in this case about 1/3 of the living area) and tie in new bracing and install new.
   A projece of this size is costly and messy. 
  This was an older house and it had a popcorn ceiling.  A texture gun with a hopper is a must with this type of ceiling!!   I would NEVER recomend buying popcorn in a spraycan or rolling it on. 
  Sheetrock in my opinion is tough unless you have quite a lot of experience with it, I would recomend finding a friend or relative that knows something about it and offering them a good home-cooked dinner.... or maybe 20 : )

Happy Sheetrocking

Roof Repair

While roof repairs can be expensive and extensive, most leaks can be repaired in a cost-effective manner.
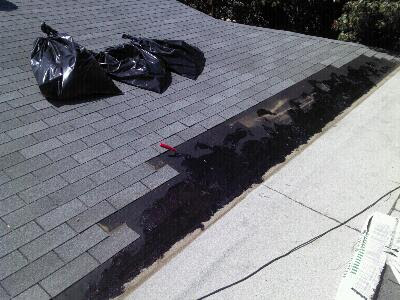
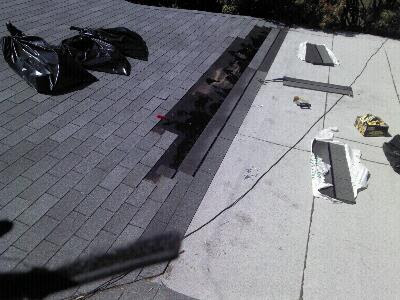
  On yesterday's project, I was dealing with a leak in an add-on where the roof met the add-on roof.  The sheetrock had been ruined and much had to be replaced.

I removed all the loose shingles and used a fiberous tar sealer to fill all the cracks and holes.
  I then went back with new shingles and roofed like you normally do roofing.  This completely sealed the joint between the two roofs.
   It is very important to get rid of all loose and bad shingles no matter how many are bad.  In this case we had whole sections that had blown up with the wind and were not nailed properly.
  If you can, it's better if you can do it on a warm day so the glue backing will stick to the shingles properly.

Happy Roofing

Tuesday, March 5, 2013

Foundation Repair

While we do not do major foundation repair, sometimes we do minor repairs and leveling to homes that have shifted with the North Texas soil. This house had some floor issues where the beams under the house had shifted and were pushing outward.
The floor was pushing the sliding door and entire wall outward...
We dug far enough down to get under the house...
We used jacks and very long threaded 3/4 inch bolts to attach to solid bracing under the house, and used the power of the bolts tightening against the solid bracing to pull the side of the house back together.   Quite a heavy chore, but it worked!!
Here is the finished product after we filled the dirt back in.  It held itself in place and was a very cost-effective repair...


Happy Digging!!

Saturday, March 2, 2013

Backsplash

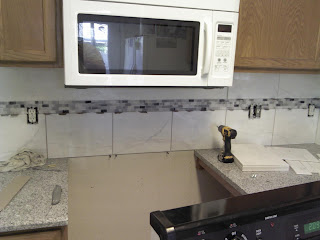
Here is a backsplash I installed Friday..

Started on a sheetrock wall, I sealed the edges with silicone

Starting the customers design


Pulled the plugs out to the front edge of the tile

Grouted it with white pre-mixed grout.  About a 5 hour process
from start to finish.
(Now we hope they paint the cabinets!)
Happy Backsplashing!

Tuesday, February 26, 2013

Commercial Bathroom Stall Doors

Here's a project we worked on a few weeks ago.
We set up at night to build new stall doors in the bathrooms,
semi-rustic (whatever that means) but this is what the design
came out looking like...
I decided that using outdoor privacy fence gate hardware would fit
best with the design.
We painted them later with the restaurant colors, it seemed to fit well
with restaurant style.
Happy Privacy!

Sunday, February 24, 2013

When Mice Attack!

A rental property left vacant for just a few weeks....

This is pictures I took under the dishwasher.
All the plastic pipes under the dishwasher had been chewed on.
But it even got worse!!
The back of the pump housing was plastic as well, and it had been chewed through in multiple places...the dishwasher was a total loss.

The moral to the story is: rodents and pests can do costly damage even when no one is around and it looks as though everything is cleaned up.  It's good to have good repellent set about when a house is going to be vacant for a while.  Just the fact that rodents like to come in out of the cold, and must eat to survive, should warn us to keep repellent out to avoid this type of costly disaster.

Happy Hunting!

Closet Ideas


Here's some ideas from a closet we built.
(Click on a picture to enlarge it)
We used 3/4 inch MDF board only.  We cut it down for bracing, trim, shelves...pretty much everything except the hanging rods was made out of MDF board.
The biggest challenge was extremely small closet space.  We had to get creative to make everything fit. (Plus there was a designer working on this job, that's where the "creative" came in!)
Instead of over-cramming stuff, I built a box in the corner and left it empty, dead space.  We only lost that 12" x 12" very hard to reach corner.
We took over the garage for a couple days and used it as a shop...
Here is a finished view before the painters came in...
The shelves on the left are for normal shoes and high-heels.  In the top picture, you can see the shelves on the right that were spaced differently for taller shoes and boots.
The open spaces in the middle are for various length hanging clothes.

The man's side was similar, but all shelves were custom placed so you could use them from everything from tennis shoes to boots to work boots.

We like to visit Ikea and other large home improvement and furniture stores to get ideas on different styles. It's so much better to see it in person and see what works BEFORE you pay someone to build it!
We have even had a client that had cut-out cardboard so they could visualize the size of the shelves better!  A great idea!

Happy Closet Building!